 |
Blender : Modelling with cross
sections
By Olivier Saraja |
 |
|
Blender : Modelling with cross
sections
By Olivier Saraja |
|
Completing the Scene
First of all, don't forget that the texture that maps our landscape is still the Height Map. Select the landscape with a RIGHT-CLICK of the mouse, and press the F6-KEY in order to access the Texture Buttons. As we did before, click on Load Image and replace the Height Map by another nice texture of your choice.
If all has been done correctly, since the start of this tutorial, the cursor is still at the centre of the scene. If this isn't true, go to top view with the NUM-7 key and use LEFT-CLICK of the Mouse at the center of our grid. Go then to front view with the NUM-1 key and do the same. Voilà ! Your cursor is almost at the centre ! If you want, you can do SHIFT+S in order to activate the Snap Menu. Then, choose Curs->Grid in both views.
Pay attention to the
fact that you are not in Edit Mode anymore, and that no item is selected.
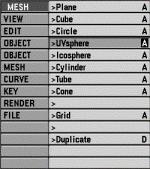
Then press the SPACE-KEY, to see a menu window poping-up. Choose MESH>UVSphere.
Say OK to the number of Segments and Rings without changing anything about
them. There are quite fine this way ! With the A-KEY, select all the vertices
of the brand new sphere.
 |
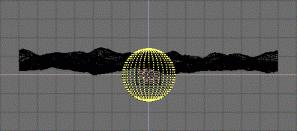 |
| Go to top view with the NUM-7 key. As we already did at the start of this tutorial, resize the sphere using the S-KEY and keeping the CTRL-KEY held. Move the mouse outward the sphere until it has a diametre about four-five times the diagonal of your landscape. |  |
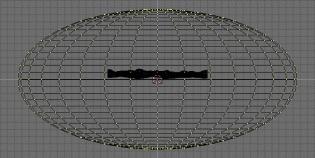 |
Go to front view or side view using the NUM-1 or NUM-3 keys. Repeat the last action (S-KEY and CTRL-KEY), but this time, click on the MIDDLE-BUTTON of the mouse all the way (in order to constrain the action to an unique direction) and moving the mouse from to bottom only. Unhold the mouse button when you have values close to these ones : Sizex : 1.000, Sizey : 1.000, Sizez : 0.800. |
Now leave the Edit
Mode by pressing the TAB-KEY. Giving you sphere a new material should be
obvious, now : F5-KEY, push the - BUTTON, and select ADD NEW. Change the
name of the material (for example, put Sky here).
The same way, give
it a texture using the F6-KEY. As we have seen it many times, now, click
on Image, then Load Image and select a nice sky texture ! Et voilà
! We are close to the end !
Tips : give
to the material of the sphere some Emit (try 0.4). You'll get a luminous
bright sky ! Moreover, you don't want it to be lit by other light beams,
such as the spot, so move the sphere on a different layer than the rest
of the scene. If you do, you'll have activate the Layer Button of the Spot,
hereafter.
|
|
|