|
MATERIALS WITHIN BLENDER
By Olivier Saraja |
 |
|
MATERIALS WITHIN BLENDER
By Olivier Saraja |
|
Introduction - Color
- Speculars - Mapping
- Channels![]()
T e x t u r e s c h a n n e l s :
It is also possible, with Blender, to specify which material property will be modified by a given texture. Let's take back our previous texture example, which will illustrate our purpose.
The texture channels can be individually set using the group buttons appearing on the far right end of the Material Buttons (F5).
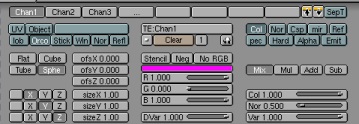
It is very useful to rename each texture in order that each name becomes
self-explanatory. In the previous picture, for example, we can see all
the eight channels, appearing as grey buttons, hosting the textures
named "Chan1", "Chan2", "Chan3" and "...".
The picture hosted by each of these channels can be redirected to one
of the following outputs, appearing as blue-green buttons : Col,
Nor, Csp, Cmir, Ref, Spec, Hard, Alpha, Emit. Its color intensity (or
shade of grey intensity) is then used in order to affect the base material,
either by mixing with it (Mix), by multiplying its intensity by
its own (Mul), by adding its intensity to its own (Add) or
by substracting its intensity to its own (Sub). In the following
tutorial, we will only pay a look to the results of the Mix button. You
should get various interesting results if you try the other buttons (Mul,
Add and Sub).
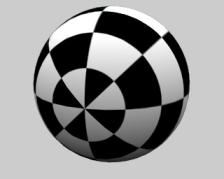
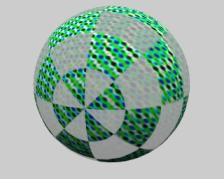
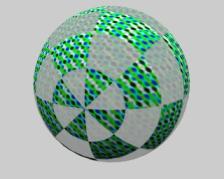
The Col output
This is the default output when you add a texture to a material, and the most useful of all. The color datum of the texture is applied to the material. The Col 1.000 slider lets you set the color intensity of the channel. You can easily figure this out by making some renders with this slider set to 1.000, 0.000 or 0.500, for example. The following pictures show the raw base material, the the same material with our study texture redirected to the Col output.
.
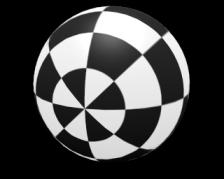
The Nor output
Another very useful output, also with its own slider : Nor 0.500. The color datum of the texture is passed to the material as a height map for the surface of the object. To be perfectly clear : dark areas of the texture are computed as hollow and the light areas as bumps. Please note that the Nor button has two positions, the second appearing with yellow text, and for which the data are inverted : the dark areas appear as bumps, and resp. The following pictures show the raw base material, then the same material with our study texture redirected to the Nor output, and then to the negative Nor (in yellow). The Nor 0.500 slider lets you set the intensity of the change applied by the texture to the Nor output, enabling you to get more or less significant bump maps based on the texture. The Nor output is the default output associated to the procedural texture 'Stucci'.
.
The other outputs are slightly more specific, but can easily find
many interesting uses in your renderings. Their intensity is set by the
Var
1.000 slider the same way the Col 1.000 and Nor 0.500 sliders
affect
the Col and Nor outputs. These two last outputs being the most useful,
they each have their own slider.
The Ref output
With it you can pass the texture intensity datum to the Reflection material property, and thus tinge the lightness of the base material. This output admits an inverted setup (text in yellow).
.
S o m e H i n t s :
The Alpha output
In order to take advantage from this output, you should turn on the UseAlpha option (and even the CalcAlpha and NegAlpha if the picture is not a Targa file coded on rgba keys) in the Texture Buttons (F6). You also need the Alpha parameter to be set to a value different from 1.000 in the Material Buttons (F5). The following pictures feature the raw material ((coloured in order to have a better view of it), then the same material with our study texture redirected to the Alpha output (with the parameters set to Alpha 0.000 and Alpha 0.500 on the second and third pictures). This output admits an inverted setup, as featured on the fifth and sixth pictures, even if this effect can be achieved through the use of the NegAlpha button. Of course, the inverted Alpha output and the NegAlpha button invert each other.
.
.
.
The Emit output
This output allows you to pass the texture intensity datum to the Emit material property. This output admits an inverted setup (text in yellow). The following pictures depicts the raw base material lighted by a low-energy Hemi lamp, then the same material (with same lighting conditions) with our study texture redirected to the Emit output with Dvar set to 0.500, and the last picture the same texture redirected to the Emit ouptut with Dvart set to 1.000.
.
.
The Csp, Spec and Hard outputs
At a final point, the effects of the Csp, Spec and Hard outputs are easily figured out with high Spec and Hard material properties, in various setups too toilsome to present here. As they are the less useful outputs, I won't write about them, but they could be of real use in modellings glass objects. Csp lets you play with the specular color, Spec with the size of the specular and Hard on its fuzziness.The Cmir output
This output is obsolete and won't be documentated here.
|
|