 |
Blender : Animating a Lightning
Strike
By Saraja Olivier |
 |
|
Blender : Animating a Lightning
Strike
By Saraja Olivier |
|
With your lightning mesh selected, go into
the Ipo control window (click many times on ![]() until you get
until you get ![]() ,
or SHIFT+F6). Activate the control keys for the material properties
(
,
or SHIFT+F6). Activate the control keys for the material properties
(![]() ).
In the vertical menu on the right end of the screen, choose the parameter
we are going to modify along Time : Alpha. Activate the edit mode
for the Ipo control curves (
).
In the vertical menu on the right end of the screen, choose the parameter
we are going to modify along Time : Alpha. Activate the edit mode
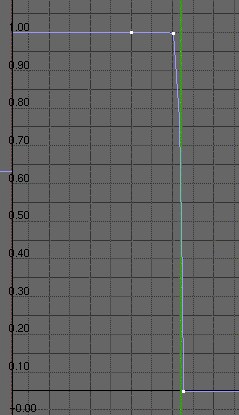
for the Ipo control curves (![]() or K-KEY). The graph presents the frames as abscissa and the value
of the parameter (Alpha in our case) on the other vertical axis
(sorry, I haven't found the english name). While pressing CTRL and
left-clicking, create a first point with the following coordinates (Frame:
50, Val: 1.00), another with the coordinates (Frame: 55, Val: 1.00) and
a last one with the coordinates (Frame: 56, Val: 1.00). You can use the
same key strokes in the graph window than in the 3D window in order to
move the view (SHIFT and middle mouse button) or to zoom in or out
(CTRL and middle mouse button). If you want to locate with precision
your three keys, you can use the S-KEY and validate Horizontal,
for example. By leaving the edit mode for control Ipo curves (
or K-KEY). The graph presents the frames as abscissa and the value
of the parameter (Alpha in our case) on the other vertical axis
(sorry, I haven't found the english name). While pressing CTRL and
left-clicking, create a first point with the following coordinates (Frame:
50, Val: 1.00), another with the coordinates (Frame: 55, Val: 1.00) and
a last one with the coordinates (Frame: 56, Val: 1.00). You can use the
same key strokes in the graph window than in the 3D window in order to
move the view (SHIFT and middle mouse button) or to zoom in or out
(CTRL and middle mouse button). If you want to locate with precision
your three keys, you can use the S-KEY and validate Horizontal,
for example. By leaving the edit mode for control Ipo curves (![]() or K-KEY again) and by editing the curve (TAB), you can select
any key you have just created, and adjust exactly its parameters with the
N-KEY.
or K-KEY again) and by editing the curve (TAB), you can select
any key you have just created, and adjust exactly its parameters with the
N-KEY.
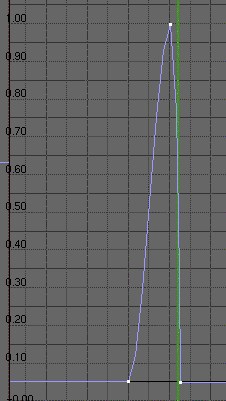
Note : For those of you curious enough to ask themselves what is the purpose of the first key, apparently useless, just think that it enables you to make the lightning appearing even more smoothly, if you give it the following parameters : Frame: 50 and Val: 0.00. See the following curve for a glimpse on the result.
Here we are with our lightning strike ! You still have to render the
animation and see that the lightning disappear just after having been built
by the Build function, which was our purpose ! You now have the
skill to simulate many marvellous lightning effect...
|
|