 |
Blender : Animating a Lightning
Strike
By Saraja Olivier |
 |
|
Blender : Animating a Lightning
Strike
By Saraja Olivier |
|
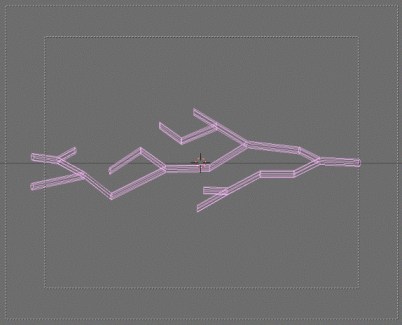
Start with a brand new Blender session (CTRL+X) and delete the default plane (TOUCHE-X). Toggle to side view (NUM-3) just before creating a six vertices circle (ESPACE>ADD>MESH>Circle, Vertices: 6) and resizing it to SizeX: 0.100, SizeY: 0.100 and SizeZ: 0.100 (S-KEY while holding CTRL). Toggle to front view (NUM-1) and extrude freely your basis circle (E-KEY and validate). Repeat many times this action in order to model a first brand of your lightning. Then deselect the last vertices created (A-KEY) and select other ones from the same circle anywhere on the branch (B-KEY once or two times, according to your preferences). Then model another branch and repeat as many times desired. Leave the edit mode (TAB-KEY) in order to save your work in the buffer memory. You should finally get something like this.
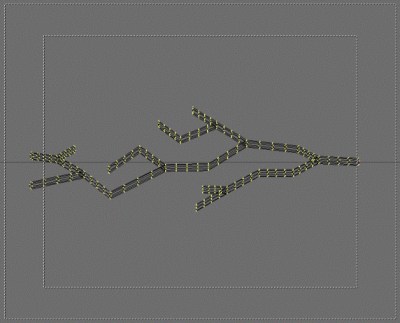
Enter again in the edit mode (TAB-KEY) and select all the vertices
(A-KEY), which should be appearing un yellow then. Invoke the Edit
buttons (F9-KEY or ![]() )
and activate the
)
and activate the ![]() button. You are now able to subdivide your mesh in the length direction
only (W-KEY, validate subdivide) two or three times (or many
more if the lightning is to be viewed from short range) according to your
needs. If the result disappoint you, press the U-KEY to reload the
original data saved in the buffer memory (all your changes since the last
time you exited edit mode are discarded). You then can leave the edit mode
(TAB-KEY) and enter the next step.
button. You are now able to subdivide your mesh in the length direction
only (W-KEY, validate subdivide) two or three times (or many
more if the lightning is to be viewed from short range) according to your
needs. If the result disappoint you, press the U-KEY to reload the
original data saved in the buffer memory (all your changes since the last
time you exited edit mode are discarded). You then can leave the edit mode
(TAB-KEY) and enter the next step.
|
|
|