 |
Blender : Animating a Lightning
Strike
By Saraja Olivier |
 |
|
Blender : Animating a Lightning
Strike
By Saraja Olivier |
|
Call the Material buttons (F4-KEY or ![]() ).
With your lightning selected, add a new material (ADD NEW) by clicking
on the
).
With your lightning selected, add a new material (ADD NEW) by clicking
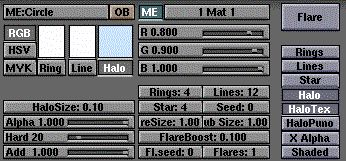
on the ![]() button. Turn your mesh into a luminous system by activating the
button. Turn your mesh into a luminous system by activating the ![]() button. Different parameter buttons appear. Activate the new
button. Different parameter buttons appear. Activate the new ![]() button. The R, G and B colours to be set are a matter
of personal taste and depends heavily on the effects your are looking for.
For a fairly realist lightning, I choose R 0.800, G 0.900
and B 1.000. Set Hard 20. HaloSize depends on your mesh density
(the number of times you applied a subdivide while the Beauty
button was activated) and will need that you render many pictures before
finding the light quality you are after. Try with values between 0.10
and 0.50 for a good start.
button. The R, G and B colours to be set are a matter
of personal taste and depends heavily on the effects your are looking for.
For a fairly realist lightning, I choose R 0.800, G 0.900
and B 1.000. Set Hard 20. HaloSize depends on your mesh density
(the number of times you applied a subdivide while the Beauty
button was activated) and will need that you render many pictures before
finding the light quality you are after. Try with values between 0.10
and 0.50 for a good start.
Now you can call the Texture buttons (F6-KEY or ![]() )
and add a new texture (ADD NEW) by clicking on the
)
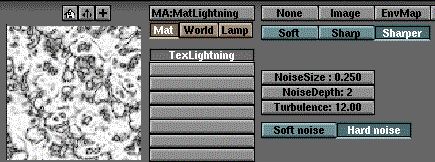
and add a new texture (ADD NEW) by clicking on the ![]() button. A row of texture types should appear. Please pick
button. A row of texture types should appear. Please pick ![]() to access the parameters of a marble procedural texture. Try the following
values : NoiseSize : 0.250, NoiseDepth : 2 and Turbulence
: 12.00. Perfect ! Activate the Hard Noise and Sharper
buttons like in the following picture. In fact, you can do almost
anything you want at this stage, the result will surely be a intersting
one, so feel free to experiment various parameters.
to access the parameters of a marble procedural texture. Try the following
values : NoiseSize : 0.250, NoiseDepth : 2 and Turbulence
: 12.00. Perfect ! Activate the Hard Noise and Sharper
buttons like in the following picture. In fact, you can do almost
anything you want at this stage, the result will surely be a intersting
one, so feel free to experiment various parameters.
Let's get back to the Material buttons (F4-KEY or ![]() )
to tune our settings. The newly created texture appears with those hideous
pink stripes which is Blender's default secondary color. Our first move
will be to modify this colour with the R, G and B sliders in the area devoted
to the texture parameters, on the right. Choose R: 1.000, G:
1.000 and B: 1.000 in order to get a perfect white that will
sharpen the light blue of the lightning. Activate the Alpha
and Mul buttons from the texture parameters buttons. On the seconf
line of texture direction display, click on X instead of Y.
The look of your texture should change drastically. Our lightning is now
ready for animation !
)
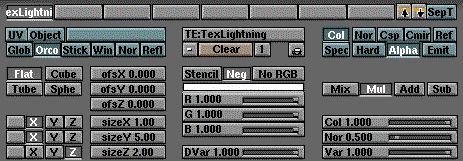
to tune our settings. The newly created texture appears with those hideous
pink stripes which is Blender's default secondary color. Our first move
will be to modify this colour with the R, G and B sliders in the area devoted
to the texture parameters, on the right. Choose R: 1.000, G:
1.000 and B: 1.000 in order to get a perfect white that will
sharpen the light blue of the lightning. Activate the Alpha
and Mul buttons from the texture parameters buttons. On the seconf
line of texture direction display, click on X instead of Y.
The look of your texture should change drastically. Our lightning is now
ready for animation !
|
|
|