KPovModeler 0.2
Written by Olivier Saraja (olivier_at_linuxgraphic.org)
English version
Step 2: Setting a few good primitives (long)
Let's go! First of all, select the 'Scene' entry in the Object tree. All subsequent objects created will be added as children objects. Add a cylinder to the scene (
Insert > Finite Solid Primitives > Cylinder
or
 Icon).
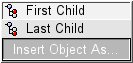
You will be prompted to choose weither the object should be inserted as a First Child or Last Child object in the Object tree. Please choose Last Child. This way, all the lines regarding the object you're currently modeling will be located at the bottom of the Object tree.
Icon).
You will be prompted to choose weither the object should be inserted as a First Child or Last Child object in the Object tree. Please choose Last Child. This way, all the lines regarding the object you're currently modeling will be located at the bottom of the Object tree.
Click on the '+' symbol standing just before the name of the new line to develop all the already available properties.
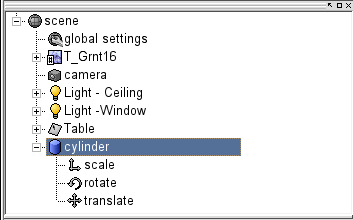
Each newly inserted object comes with these three properties: scale, rotate, translate. When they are not immediately available you can add them to the object by clicking on the object's line in the Object tree and then:
Using the menu: Insert > Transformations > Scale, Rotate and/or Translate
Using the toolbar: click on the
![]() ,
,
 or
or
 Icons
Icons
For the Finite Solid Primitives, it souldn't be necessary, so you can directly click on the existing rotate
entry in the Object Properties View and adjust parameters as follow (don't forget to press the Apply button or to hit Enter):
rotate
x = 0, y = 0, z = 90
The same way, click on the resize
![]() entry and adjust the parameters as follow:
entry and adjust the parameters as follow:
![]() scale
scale
x = 1, y = 8, z = 1
Eventually, click on the Cylinder entry and set the parameters as follow and uncheck the Hollow box:
cylinder
End 1: x = 0, y = 0.5, z = 0
End 2: x = 0, y = -0.5, z = 0
Let's create a sphere for one of the ends of the cylinder (
Insert > Finite Solid Primitives > Sphere
or
 Icon).
Please note that the Sphere has automatically inserted as Last Child object in the Object Tree, because the selected entry was the Cylinder and that it can't afford a Finite Solid Primitive entry as a Child. Now click on the Sphere entry and set the parameters as follow and uncheck the Hollow box:
sphere
Center: x = -4, y = 0, z = 0
Radius: 0.15
Of course, the sphere will later be merged with the cylinder. With the same logic, we will add two Box objects that will be substracted to the merged group object in order to make the blade of the screwdriver.
First add a new Box object to the scene (
Insert > Finite Solid Primitives > Box
or
 Icon).
Click on the '+' symbol standing just before the name of the new line to develop all the properties of the Box object. The same way we already did with the Cylinder and Sphere objects, adjust the following parameters as follow and uncheck the Hollow box:
box
Corner 1: x = -0.5, y = -0.25, z = -0.25
Corner 2: x = 0.5, y = 0.25, z = 0.25
rotate
x = 0, y = 0, z = -13
translate
x = 3.7, y = 0.35, z = 0
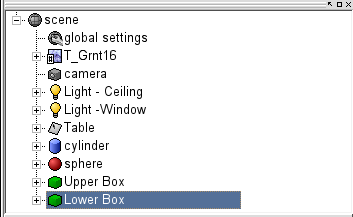
And now, for the tricky part: we will duplicate the Upper Box and turn the copy into a Lower Box. Fortunately, the Object tree will help us keeping this operation simple. Here is what we currently have in the Object tree, and what we would like to see, the Lower Box being the symetrical along the x axis of the Upper Box:

Here's how we can get this result. First of all, select the Upper Box entry in the Object tree. Make a copy of this entry (
Edit > Copy or CTRL+C
or
 Icon)
and then paste it (
Edit > Paste or CTRL+V
or
Icon)
and then paste it (
Edit > Paste or CTRL+V
or
 Icon).
With the new entry selected, immediately change its name in the Object Properties View, and then change its rotate and translate values according to the following values:
Icon).
With the new entry selected, immediately change its name in the Object Properties View, and then change its rotate and translate values according to the following values:
rotate
x = 0, y = 0, z = 13
translate
x = 3.7, y = -0.35, z = 0