 |
Blender : Animation effects
By |
 |
|
Blender : Animation effects
By |
|
| Introduction- | Build | -Wave | -Particles | -Static |
Blender offers a complete
set of animation effects ready for use, only waiting for your creativity
to bloom on your screen. We'll study here the use of the Build,
Wave and Particles effects, in the ascending difficulty
order, and give you many examples of use through full-length exercices.
In any case, you can access these special effects by pressing the F7-KEY,
or by clicking on the animation button ![]() .
The following command buttons should then appear.
.
The following command buttons should then appear.
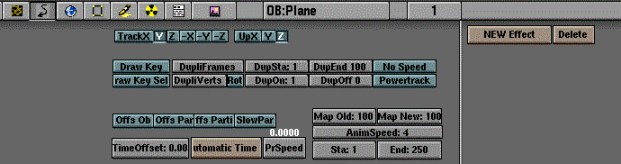
We'll pay special attention
to the buttons on the right : ![]() and
and ![]() .
The other buttons will perhaps be studied in another tutorial.
.
The other buttons will perhaps be studied in another tutorial.
Basics
All animation effects requires
that you have a mesh on which they can act. Select the object you
wish to animate (right click with the mouse) to make it appear in pink.
Click now on the ![]() button. A small box toggled 'on' should appear by the side of the
button. A small box toggled 'on' should appear by the side of the ![]() button. Don't pay attention to it for now, but know that it works almost
the same way than the small buttons used for controlling the layers of
your scene.
button. Don't pay attention to it for now, but know that it works almost
the same way than the small buttons used for controlling the layers of
your scene.

You should also see appearing,
more on the right, a ![]() button with the minus sign at its end. It is a scrolling menu. Click
and hold this button to see the animation effects available in Blender.
button with the minus sign at its end. It is a scrolling menu. Click
and hold this button to see the animation effects available in Blender.

You can now choose Build,
Particles
or Waves, according to the effect you are looking for, and see that
other buttons, which will be your effect parameters, appear in each case
to tune your effects.
Please note also that, even
if we'll not study this in this already promising tutorial, it is possible
to assign many animation effects to the same objects, and that each of
them appears as a small little box on the side of the ![]() button. Click on the little box asociated to the effect you want to change. Beware
! When you click on the
button. Click on the little box asociated to the effect you want to change. Beware
! When you click on the ![]() button, you erase all the animation effects associated to the active little
box, and loose all its parameters !
button, you erase all the animation effects associated to the active little
box, and loose all its parameters !
|
|
|