 |
Blender : Animation effects
By Saraja Olivier |
 |
|
Blender : Animation effects
By Saraja Olivier |
|
| Introduction- | Build | -Wave | -Particles | -Static |
Particles are dimensionless items emitted by meshes. We give them Halo
properties in order to simulate a simple way fire, smoke, water drops,
clouds and even mist. When you activate the ![]() button, particules transform into objects the same as the emitter is parented
to, which is very handy to simulate flocks of bugs, birds or even fishes.
To start, we'll take again our good ol' UVSphere. Start a new session
(CTRL+X) and erase the default plane (ALT+X). Then add a
UVSphere (SPACEBAR>ADD>MESH>UVSphere) and validate all the
default parameters. Make sure the sphere is selected and appear in pink.
Then invoke the Animation Buttons (F7) and click one time
on the
button, particules transform into objects the same as the emitter is parented
to, which is very handy to simulate flocks of bugs, birds or even fishes.
To start, we'll take again our good ol' UVSphere. Start a new session
(CTRL+X) and erase the default plane (ALT+X). Then add a
UVSphere (SPACEBAR>ADD>MESH>UVSphere) and validate all the
default parameters. Make sure the sphere is selected and appear in pink.
Then invoke the Animation Buttons (F7) and click one time
on the ![]() button. Then click on
button. Then click on ![]() and hold to have the time to select the Particles effect. You should
see, then, the following.
and hold to have the time to select the Particles effect. You should
see, then, the following.
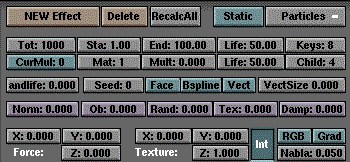
It will get too long to explain with full details how each of these buttons act. If you are interested in a full description, please get the official Blender Manual. This tutorial will only explain the most used parameters and the one without which you could do anything. They are split in three main categories. Practices could go further in explanation, though.
Population and lifetime of particles :
Tot defines the number of particles. Be especially careful with this parameter, as it uses lots of memory and asks for more rendering time. Sta sets the Frame during which the first particle is emitted and End the Frame at wich the object cease to emit anything. It is very common to set Sta to a negative value (for the effect to stabilize to its "cruise rate") and End to a value greater than the Frames number of your animation (because you don't want your effect to dim before the end of your animation). Life is a measure of the lifetime of a particle (e.g., the number of Frames it will evolve before disappearing). Keys enhance the fluidity of your animation, at the price of an increase of both memory and rendering time. Mult: 1.000 enables a particle to multiply itself by a number set by the Child parameter (these particles will have a lifetime set by the second Life button). RandLife and Seed apply to the lifetime of a particle a random variation (in fact, it is only a pseudo randomness, because for a given RandLife value, the obtained result will always be the same, repetitive and predictable, unless you also set to another value the Seed parameter).
Speed of particles :
The Norm button constrain the starting direction of the particle. The higher is the value, the more the particle will be emitted along the normal to the emitter. Ob defines how much the very own speed of the emitter will add to the speed of the particle, whereas Rand applies to the speed of the particle a random variation. At last, Damp simulates the intertia of the particle, and offers a mean to control its slowing along time.
Movement of particles :
Force constrains the direction taken by the particles after they
have been emitted, X, Y and
Z defines the vector direction
associated to this direction (remember to activate the ![]() button to visualize better what your are setting parameters to). It
is perfect to simulate the effect of wind upon flames or smoke, or even
the angle water drops make with the vertical in the case of rain or waterfall.
button to visualize better what your are setting parameters to). It
is perfect to simulate the effect of wind upon flames or smoke, or even
the angle water drops make with the vertical in the case of rain or waterfall.
P r a c t i c e s :
Modelling clouds or mist with Blender
Animationg a Flock of Bugs
|
|
|