 |
by /i> |
 |
|
| A r t i c l e s |
|
|
|
|
by /i> |
|
|
| A r t i c l e s |
|
|
|
|
Introduction
After having modelled your
scene, the last step is to make it pseudo-ralistic. In other words, you
built a mesh and you want to turn it into a good looking and realistic
object. In order to do this, we "render" objects with a proper tool, called
a "rendering engine", either in a "bare" mode, in which objects only have
a color and some special properties, or in a "textured" mode, in which
the objects are given a texture (just like skin, clothes...) mapped onto
their external surface.
 To map a texture means that
you apply a bitmap picture (jpg, png, gif format are only some of the possibilities)
on an external surface to give it a particular look that can't be achieved
through mere modelling. For instance, if we choose to depict an object
assembled with rivets, we are not going to model each rivet on a one by
one basis. We will instead use the following trick : we will map a
picture showing riveted metal plates in order to create the illusion of
riveting.
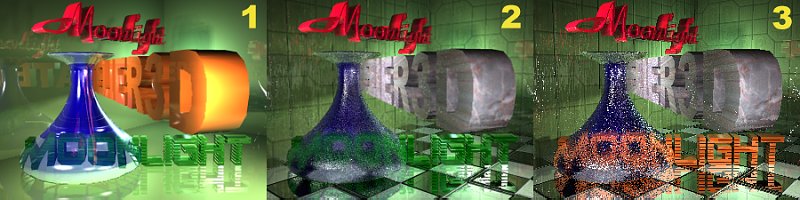
In fact, it is due to the advanced capabilities of Moonlight. It lets you add to the mapping picture many characteristics from the linked material, be it ever color, reflection, refraction, specularity, emittance or transparency. This way, if the glass had been given a brick texture, it should have the look of an object made out of glass bricks : that's all ! You should also notice that the floor, which was given (before texture mapping) a light grey material color with a reflection component, is mapped with black and white tiles. Due to the reflection component, it is affected by the greenish color inherited from the walls. And these are green just because the properties of the base material have been kept. The third picture is the same as the second except for the color of the Moonlight text and the oversampling (antialiasing) which has been deactivated during the rendering, while it was activated with a level of 2 (on 5 levels existing) for the two first ones. The bump map appears more obviously this way. It is easy to understand that a scene made only with bright and polished objects can only be unrealistic ; the mapping of a plane picture could only slightly improve the results. We have to create the illusion of relief that exists in the reality on our walls and floors, where the junctures are not at the same level than the tiles, for example. Bump maps are easily set in Moolight, in order to give a choosen amount of relief and to improve the visual aspect of our scenes. |