A.13 Receiving input from the user

A.13.1 Interact with the keyboard

Currently, text can be accepted from the user during program execution mainly via 3 primitives: key?, readchar and read.


key?


Is read as true or false according to whether a key has been pressed or not since the start of program execution.


readchar


These are the values given for particular keys:


A —> 65 B —> 66 C —> 67 etc ... Z —> 90
← —> -37 or -226 (NumPad) ↑ —> -38 or -224 → —> -39 or -227 ↓ —> -40 or -225
Echap —> 27 F1 —> -112 F2 —> -113 .... F12 —> -123
Shift —> -16 Espace —> 32 Ctrl —> -17 Enter —> 10


Table A.2Values for particular keys

If you are uncertain about the value returned by a key, you can type:

pr readchar. The interpreter will then wait for you to type on a key before giving you the corresponding value.


read list1 word2


Presents a dialogue box whose title is list1. The user can then input a response in a text field, and the response will be stored in the form of a word or a list (if the user wrote several words) in the variable word2, and will be evaluated when the OK button is pressed.

A.13.2 Some examples of usage:


 to vintage
 read [What is your age?] "age
 make "age :age
 if :age<18 [pr [you are a minor]]
 if or :age=18 :age>18 [pr [you are an adult]]
 if :age>99 [pr [Respect is due!!]]
 end
 
 to rallye
 if key? [
 make "car readchar
 if :car=-37 [lt 90]
 if :car=-39 [rt 90]
 if :car=-38 [fd 10]
 if :car=-40 [bk 10]
 if :car=27 [stop]
 ]
 rallye
 end
 # You can control the turtle with the keyboard, and stop with Esc
 

A.13.3 Interact with the mouse

Currently, mouse events can be accepted from the user during program execution via three primitives: readmouse, mousepos and mouse?.


readmouse


The program is paused until the user presses the mouse. Then, it returns a number that represents the event. These are the differents values:

The button 1 is the left button , the button 2 is the next on the right ...


mousepos, mouseposition


Returns a list that contains the position of the mouse.


mouse?


Returns true if we touch the mouse since the program begins. Returns false otherwise.

A.13.4 Some examples of usage:

In this first procedure, the turtle follows the mouse when it moves on the screen.
 to example
 # when the mouse moves, go to the next position
 if readmouse=0 [setpos mousepos]
 example
 end

In this second procedure, it’s the same but you must click with the left button of the mouse if you want the turtle to move.

 to example2
 if readmouse=1 [setpos mousepos]
 example2
 end

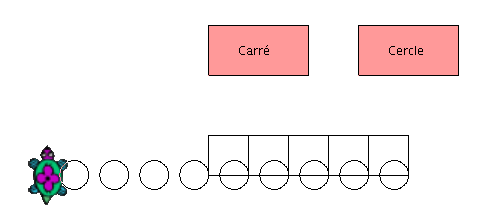
In this third example, we create two pink buttons. If we left-click on the left button, we draw a square with a side of 40. if we left-click on the right button, we draw a little circle. Last, if we right-click on the right button, it stops the program.

pict

 to button
 #create a pink rectangular button (height 50 - width 100)
 repeat 2[fd 50 rt 90 fd 100 rt 90]
 rt 45 pu fd 10 pd setpc [255 153 153]
 fill bk 10 lt 45 pd setpc 0
 end
 
 to lance
 cs button pu setpos [150 0] pd button
 pu setpos [30 20] pd label "Square
 pu setpos [180 20] pd label "Circle
 pu setpos [0 -100] pd
 mouse
 end
 
 to mouse
 # we put the value of readmouse in the variable ev
 make "ev readmouse
 # we put the first coordinate of the mouse in variable x
 make "x item 1 mousepos
 # we put the second coordinate of the mouse in variable y
 make "y item 2 mousepos
 # When we click on the left button
                                                                                                  
                                                                                                  
 if :ev=1 & :x>0 & :x<100 & :y>0 & :y<50 [square]
 # When we click on the right button
 if  :x>150 & :x<250 & :y>0 & :y<50 [
           if :ev=1 [circle]
           if :ev=3 [stop]
 ]
 mouse
 end
 
 to circle
 repeat 90 [fd 1 lt 4] lt 90 pu  fd 40 rt 90 pd
 end
 
 to square
 repeat 4 [fd 40 rt 90] rt 90 fd 40 lt 90
 end

A.13.5 Graphical components

With XLogo, you can add several graphical components on the drawing area (Button or Menu). All the primitives allowing the user to manipulate those components start with the prefix GUI (for Graphical User Interface).
Create a component
First, you need to create those graphical objects, then you can modify some of their properties and last, you can display them on the drawing area

Modify some properties of graphical components


guiposition word1 list2


Locates the graphical element word1 on a specific place with its coordinate. For example, if you want to put the button at the point with coordinates (20;100), you will write:

  guiposition "b [20 100]

If you don’t specify a location for the component, it will be placed by default on the upper left corner of the drawing area.


guiremove word1


Remove a graphical component. For example, to delete the button:
  guiremove "b


guiaction word1 list2


Defines an action for the component when the user interacts with it.

 # the turtle forwards of 100 if we click on the button "b
  guiaction "b [fd 100 ]
 
 # For the combo menu, each  item has its own action
 guiaction "m [[print "item1]  [print "item2] [print "item3]]


guidraw word1


Displays the graphical component on the drawing area. For example, to display the button:

  guidraw "b