>From version 0.9.92, our turtle can leave its plane and move into 3D space. To switch to this mode, we use the
primitive perspective. Welcome to a 3D world!
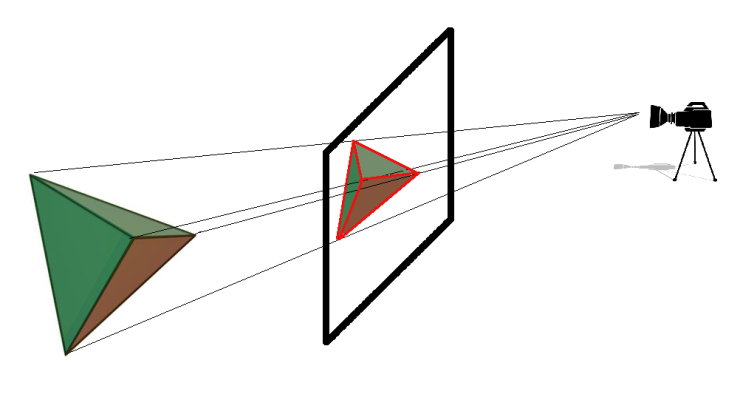
To represent a 3D space on a 2D plane, XLOGO uses a projection perspective.
A camera looks at the 3D scene, where the image from the projection screen is displaying. Here is a little scheme to
explain this:
Some primitives allow us to set the camera position. The screen projection is half the distance from the
camera.
In a 2D plane, the turtle’s orientation was only defined by its
heading. In a 3D world, the turtle’s orientation is given by 3 angles:
- Roll: The turtle’s angle around axis (Oy)
- Pitch: The turtle’s angle around axis (Ox)
- Heading: The turtle’s angle around axis (Oz)
In fact, to move itself in the 3D World, the turtle is very similar to an aircraft. Here is a little illustration which
represents these 3 values:
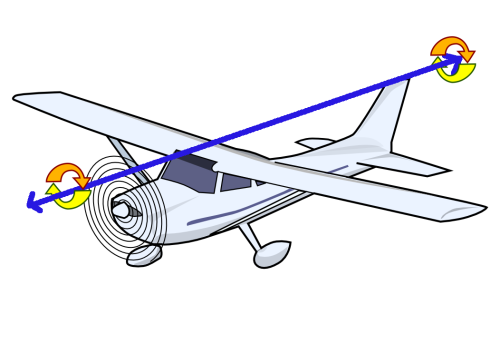 Roll Roll |
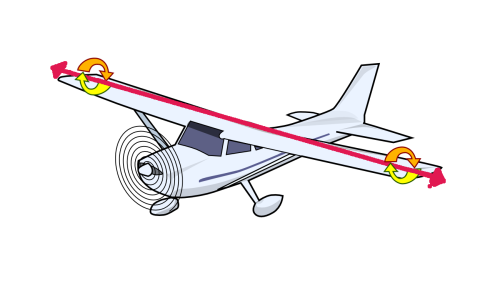 Pitch Pitch |
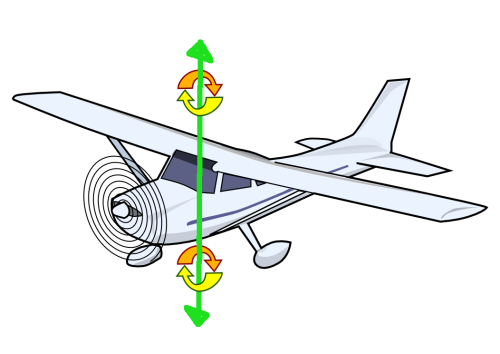 Heading Heading |
It seems quite complex at first, but you will see that a lot of things stay very similar to moving in a 2D plane. Here
are the basic primitives for moving in the 3D world:
Same behaviour as in 2D plane.
Same behaviour as in 2D plane.
The turtle turns n degrees to the right around its longitudinal axis.
The turtle turns n degrees to the left around its longitudinal axis.
The turtle goes n degrees up around its transversal axis.
The turtle goes n degrees down around its transversal axis.
In the 2D plane, when we want to draw a square of side 200 steps, we write:
These instructions are still available in the 3D world, where the square is drawn in perspective mode. If the
turtle goes down 90 degrees, we can draw another square and we obtain:
 cs
 repeat 4[fd 200 rt 90]
 down 90
 repeat 4[fd 200 rt 90]
|
You just have to try some examples to understand these orientations and become an expert!
You must understand that the 3 rotation primitives are linked together, for example try this:
 cs
 leftroll 90 up 90 rightroll 90
|
The turtles movement is equivalent to
left 90 (You can try with your hand
simulating the turtle if you don’t
understand) |
The following primitives are available in 2D plane or in 3D
world. The only difference is the arguments received by the primitives. For example, the primitive setpos or
setposition is still waiting for a list as an argument but now, the list must contain three numbers (x;y;z) which
represent the three point coordinates. Here are all those primitives:
| circle | arc | home | towards | | distance | setpos, setposition | setx | sety |
| setheading | label | labellength | dot |
| pos, position | heading | | |
|
Primitives only available in 3D mode
This primitive moves the turtle to the chosen point. This primitive is waiting for three arguments representing the
point’s coordinates. setxyz is very similar to setpos but the coordinates are not written into a list.
Example, setxyz -100 200 50: move the turtle to the point x = −100;y = 200;z = 50
This primitive moves the turtle to the point with the valid value z. setz is waiting for one number as an argument.
This primitive is comparable to setx or sety.
Set the turtle’s orientation. This primitive waits for a list which contains 3 numbers, the roll, the pitch and the
heading.
Example, setorientation [100 0 58]: the turtle has roll: 100 degrees, pitch: 0 degree and heading: 58
degrees.
Returns the turtle’s orientation in a list which contains: [ roll pitch heading ]. Note the number order, if
for example, the orientation value is [100 20 90], this means that if you want the same orientation
starting from the origin position (after a clearscreen instruction), you’ll have to write the following
sequence:
rightroll 100 up 20 right 90 |
If you inverse the instruction’s order, you don’t obtain the valid orientation!
The turtle turns around its longitudinal axis to the chosen roll angle.
Returns the current roll value.
The turtle turns around its transversal axis to the chosen pitch angle.
Returns the current pitch value.
A 3D Viewer is included in XLogo, it allows you to visualize your drawing in 3D. This module
uses the JAVA3D library, so it’s necessary to have java3D fully installed.
Here are the rules to use the 3D Viewer:
When we create a geometric figure on the drawing area, we have to indicate to the 3D Viewer which shapes we want
to record for future visualization. It’s possible to record polygons (surfaces), lines, points or text. To use this feature,
here are the primitives:
The following turtle’s moves are saved to create a polygon.
Since the last polystart call, the turtle has gone through several vertices. This new polygon is recorded, its color is
defined by all vertices color. This primitive finalizes the polygon.
The following turtle’s moves are saved to create a strip line.
Since the last linestart call, the turtle has gone through several vertices. This new line is recorded, its color is
defined by all vertices color. This primitive finalizes the strip line.
The following turtle’s moves are saved to create a point set.
This primitive finalizes the point set.
Each time the user displays text on the drawing area with the primitive label, it will be recorded and then
displayed by the 3D Viewer.
End of text recording.
Launch the 3D viewer, all recorded objects are drawn on this new window. You have control of the camera
scene:
- You can rotate the scene by clicking on the mouse’s left button.
- You can translate the scene by clicking on the mouse’s right button.
- You can zoom the scene with the mouse’s wheel button.
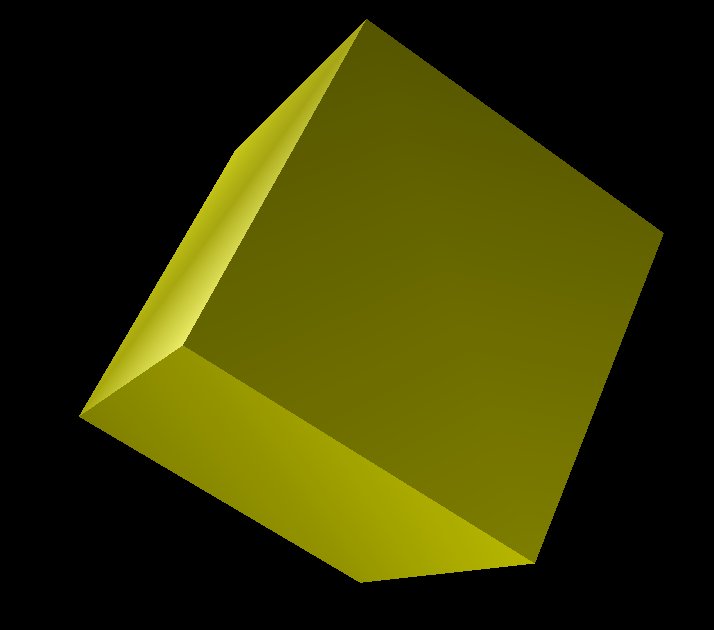
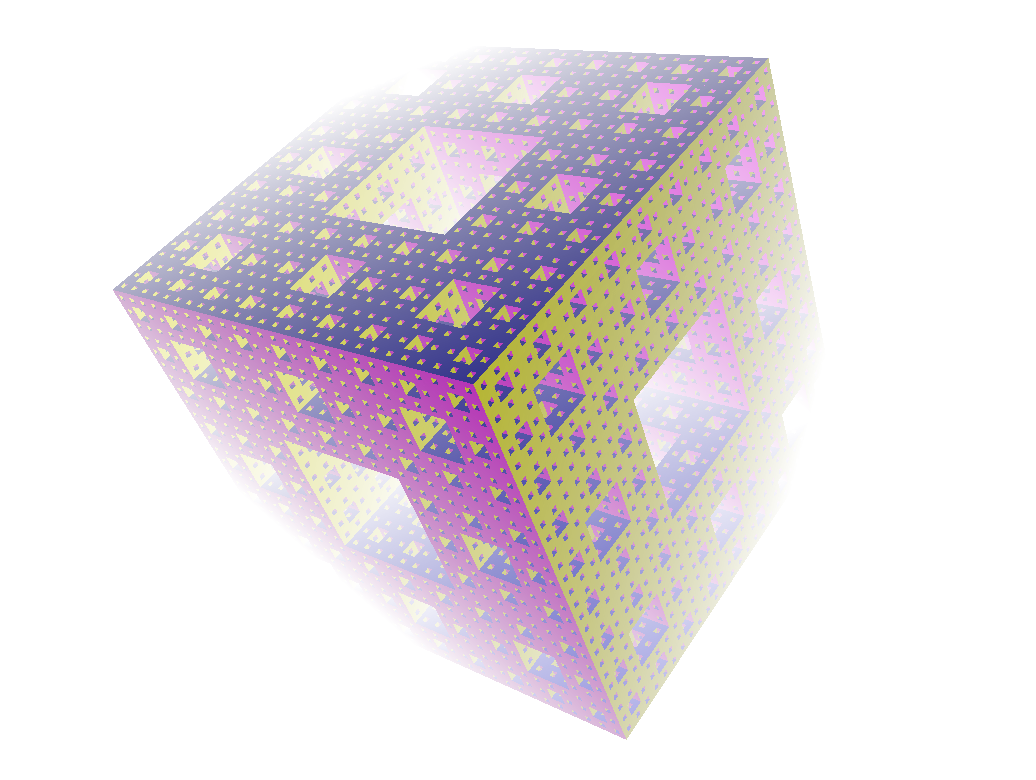
All faces are 400 steps square. Here is the program:
 to square
 # we record the vertice square
 polystart repeat 4[forward 400 right 90] polyend
 end

 to simpleCube
 # yellow cube
 clearscreen perspective setpencolor yellow
 # lateral faces
 repeat 4[square penup right 90 forward 400 left 90 rightroll 90 pendown]
 # bottom face
 downpitch 90 square uppitch 90
 # upper face
 forward 400 downpitch 90 square
 # visualization
 view3d
 end
|
We launch with the command: simpleCube:
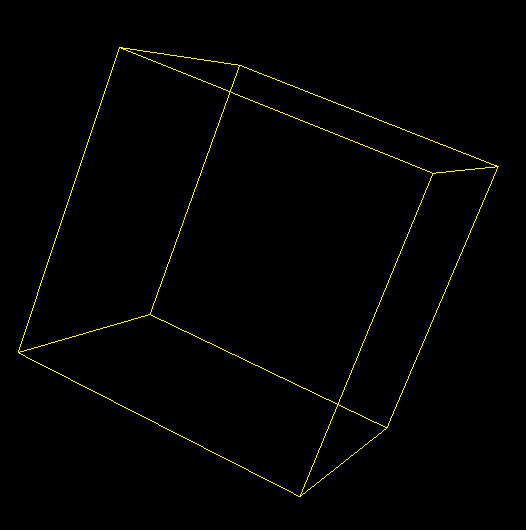
When we replace in the procedure square, polystart with linestart and polyend with lineend
If we had used pointstart and pointend instead of linestart and lineend, we would see on
screen only the eight cube vertices. These primitives are very useful to display the point set in 3D
Space.
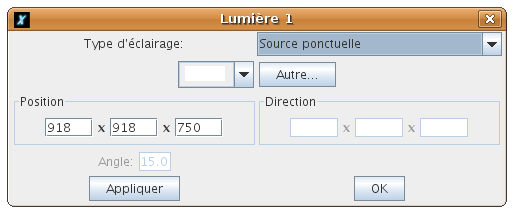
You can specify four lights in your 3D scene. By default, the main 3D scene has only
two ponctual lights enabled. Click on one of the 4 button lights in the 3D modeler, and this dialog box
appears:
Several light type are available:
- Ambient light: uniform light, you just have to specify its color.
- Unidirectional light: diffuses according to a constant direction. It’s the same case as a ponctual light
when the source is very very far from the observer. For example, the case of sun.
- Ponctual light: This light has a specified position. This light is similar to a headlight.
- Spot Light: it is a ponctual light but the light is only displayed in a light cone. You have to specify a
value angle for this cone.
The best thing is to play with those lights to understand how they work!
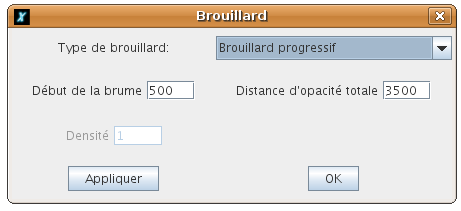
You can add a fog effect on the main 3d scene. Click on the cloud button in the 3D scene and
this dialog box appears.
Two fogs are available:
- Progressive fog: this fog’s opactity is progressive. You have to specify two parameters:
- The distance from which fog begins.
- The disatnce from which opacity is full
- uniform fog: This fog is uniform on the whole scene. You just have to specify the fog’s density.
Example with a progressive fog: